The title of this chapter, "Drawing with Brushes" is shorthand for applying brush strokes to paths. You’ll have more fun, be more productive, and be less frustrated if you take a moment to appreciate the difference.

The Brushes Palette
View the Brushes palette by choosing Window > Brushes. The F5 function key also displays (or hides) the Brushes palette.
The Brushes palette menu allows you to choose which of the four types of brushes to display. The flyout menu also allows you to choose between displaying brushes in List view or Thumbnail view.
Envision a graphic artist a hundred years ago choosing from a set of feather pens. Or, for a more modern example, imagine a painter with an array of paintbrushes. Now forget that image and read on. For all practical purposes, drawing a path and applying a brush stroke are generally two distinct processes in digital design, particularly in Illustrator.
Remember that the heart of Illustrator is the ability to define vector paths, usually using the Pen or Pencil tool. The paths can have an almost infinite variety of fills, stroke properties, and other effects. Among these effects is an amazing variety of brushlike stroke attributes.
You can select a brush from Illustrator’s Brushes palette and "paint" with it, using a mouse or drawing tablet. The advantage is that you can draw a path and apply stroke attributes all at once. The disadvantage is that you have to manage both drawing and strokes simultaneously. You’ll learn how later in this chapter.
However, for most of the techniques in this chapter the assumption is that you have drawn your path, and are now ready to apply brush stroke attributes to that path.
#25 Applying or Drawing with Brushes
As noted in the introduction to this chapter, there are two ways to use the Paintbrush tool. You can draw with the brushes, or you can apply them to existing strokes.
Drawing with the Paintbrush tool is similar to drawing with the Pencil tool. The main difference is that drawing with the Paintbrush tool applies the selected brush stroke to a path as you draw ( Figure 25a ).
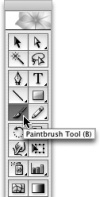
Figure 25a Selecting the Paintbrush tool in the toolbox.
To draw a brush stroke in one step, select the Paintbrush tool. In the Brushes palette, choose a brush stroke. Then draw as you would with the Pencil tool ( Figure 25b ).
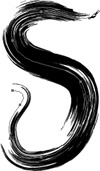
Figure 25b Drawing a path with the Paintbrush tool and a brush selected.
Note
See #19, "Drawing with the Pencil Tool," for advice on drawing with the Pencil tool.
You can apply a brush pattern to a stroke by selecting the stroke and clicking on a brush in the Brushes palette. This works for strokes that already have a brush applied; selecting a brush in the Brushes palettechanges the applied stroke.
Brushes Don’t Work with Letter Type or the Symbol Sprayer Tool
You can’t apply a brush pattern to letter type. If you want to apply brushes to letters, one option is to convert the type to outlines (see #68, "Outlining Type.").
You also can’t apply brush strokes to objects generated by the Symbol Sprayer tool. You control those objects using symbols (see #94, "Using Symbols and Actions").
Brush Libraries
Illustrator ships with libraries of brushes. To access them, choose Window > Brush Libraries, and select one of dozens of libraries of brush strokes. You apply brushes from Brush libraries the same way you apply them from the Brushes palette.
The Brushes palette has four icons on the bottom ( Figure 25c ).

Figure 25c The Brushes palette.
To remove a brush stroke from a selected path, click the Remove Brush Stroke icon at the bottom of the Brushes palette menu ( Figure 25d ).
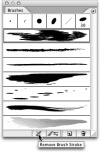
Figure 25d brushesremoving brush stroke from pathpathsremoving brush stroke fromremovingRemoving a brush stroke.
The Four Types of Brushes
Calligraphic brushes apply strokes that look like ink flow from calligraphy pens.
Art brushes stretch a single image along the entire length of a path.
Scatter brushes "scatter" pattern objects along a path.
Pattern brushes include up to five tiles that interactively associate with sides, corners, and endpoints of a stroke.
You can filter the Brushes palette to display selected types of brushes by selecting (or deselecting) a brush type from the Brushes palette menu.
The Options of Selected Object button opens a different set of options for each type of brush. The New Brush icon allows you to define a custom brush. Both options will be explored in the remaining techniques in this chapter, which discuss the four types of brushes. The Delete Brush icon is not used to remove a brush from a stroke; it deletes the brush from the palette.
Source