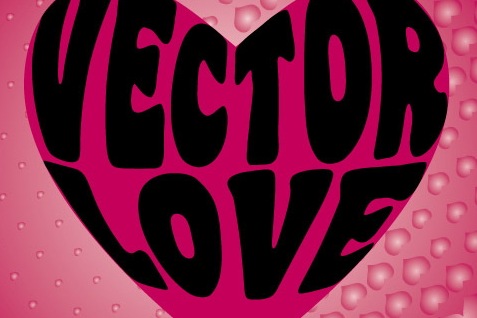
In this tutorial, we will see how we can warp the text around a shape or a object. This technique will show you how to combine the text wrap and heart shape together to achieve the text wrap effect. This tutorial will concentrate on how to use Envelope Distort feature in Illustrator to achieve this effect. You will also learn some new techniques along the way. For this to work effectively, first we have to decide on a suitable shape.
Secondly, we will need to decide what word to warp inside the shape. Normally a short phrase works best. And finally, we need a thick and fancy font to pull the trick.
For this tutorial, we will be using a heart shape since Valentine’s Day is around the corner. We will be using a font Coaster for the words. We will write the words, “Vector Love” to declare out love for vectors. But you can choose any shape, fonts, words etc… Experiment with different shapes and words to see which works best. Also, if you are using more complex shape or curved lines just be careful that the words remain legible.
Step 1:
Draw a heart shape with Pen Tool (P). Fill it with red color or any color you wish and set the stroke to None.

Step 2:
Select the heart shape, copy it by clicking Edit > Copy and paste using Edit > Paste in Front. Select one of the heart and in the Layer Palette. Hide and lock it by clicking on eye and lock icon. We will use it at the end of the tutorial again.

Step 3:
Now the next step is to divide the heart shape in three different parts. keep the Fill to None and set Stroke to white color. Adjust the Stroke Weight (Window > Stroke Palette) to about 5 points. With the Pen Tool (P), draw two lines as shown in the figure below. You can also draw a slight curved line as well, but for the purpose of this tutorial, we will keep things simple.
Ensure that the start and end points of the lines is outside the heart shape as indicated by blue circles. After each line press Ctrl/Command and click outside the shape to deselect.

Step 4:
Select both the lines that we drew in Step 3 and choose Object > Path > Outline Stroke.

Step 5:
Then Select All (Ctrl/Command+A) and choose Window > Pathfinder. Click the Subtract from Shape Area button while holding down Alt/Opt Key.

After that, select the shape and click Object > Ungroup to ungroup. Now your heart shape should be divided in three parts.

NOTE: If you are using Illustrator CS3 and above and able to handle the mouse quite well, you can divide the shape with Eraser Tool (Shift + E). Double-click on the Eraser Tool to adjust the Diameter and other parameters. Pen Tool (P) will work better if you want to divide the shape in more complex curves.
Step 6:
Using the Type Tool (T) type “VECTOR”. Press Ctrl/Command and click anywhere on the artboard to exit the text box. Then, type “LOVE”. Keep the font size to around 150 to 190 Points. I use the font Coaster Black in this example as mentioned above.

Step 7:
Select the word, “VECTOR” with Selection Tool(V). Choose Object > Arrange > Send to Back (you can also access that by right clicking on your letters while it is still selected).
Now press Shift Key and with the Selection Tool (V) click on top heart shape and “VECTOR” and choose Object > Envelop Distort > Make with Top Object. Keep the Smart Guides On(Ctrl/Comm + U) to help you see your shape if the letter gets hidden behind the shape.

Step 8:
Repeat the process mentioned in Step 6 with the word “LOVE”, select it Send it to Back, then select (with Selection Tool-V) the bottom heart shape and the letters while holding down Shift key. And choose, Object > Envelop Distort > Make with Top Object.

Step 9:
Now we are almost done. If you wish to change the colors of the text, you can do it by selecting them all (Ctrl/Commmand + A) and then choose Object > Envelop Distort > Edit Contents. I kept the colors same as black.
Finally, just unhide the heart shape that we have hidden and locked in Step 2. Click on the eye button to unhide it. I have changed it’s Fill color to a shade of pink. I also deleted the unwanted shapes left over from the other heart shape as we do not need it. Now it should look something as shown below.

Step 10:
Finally, to make an interesting background, I use a free vector graphics Halftone-Heart (from Qvectors). Open up the file and copy paste it on a new layer in my document. Drag the layer below so that it is behind the heart shape. Fill it with the same pink color and set the stroke to none.

I also deleted the excess paths with Clipping mask. Draw a square shape with Rectangle Tool (M). Select both shapes (pattern and square) then choose, Object > Clipping Mask > Make. Finally, fill it with a Radial Gradient to get the following image.

Here is the another example. I changed the colors and grouped (Object > Group) the entire artwork. Next I apply Effect > Distort > Glass using the following parameters:


And below you will see a another example image I made long time back using the same technique as shown above with the words, “Is That You?”. You can see the finished piece at my dA.

The key is to experiment with different shapes and text, I hope you have learnt something new in this tutorial. I will love to see what you have done using this technique.
Source
http://www.vectordiary.com/illustrator/warp-text-inside-a-heart-shape-tutorial/
