Numerous examples from robots to bicycles have been offered as “easy” explanations of what OOP is. I’ve opted to show you how OOP works with a real-life example, for a programmer. By creating a MySQL CRUD class you can easily create, read, update and delete entries in any of your projects, regardless of how the database is designed.
http://net.tutsplus.com/tutorials/php/real-world-oop-with-php-and-mysql/comment-page-1/#comments

Setting up the skeleton of our class is fairly simple once we figure out exactly what we need. First we need to make sure that we can do our basic MySQL functions. In order to do this, we need the following functions:
- Select
- Insert
- Delete
- Update
- Connect
- Disconnect
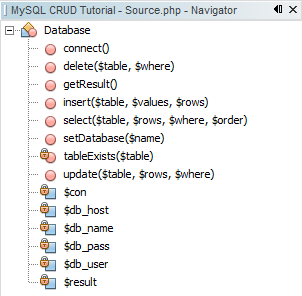
Those seem pretty basic, but I’m sure that as we go through, we’ll notice that a lot of them utilize some similar aspects, so we may have to create more classes. Here is what your class definition should look like. Notice that I made sure that the methods were created with the public keyword.
- class Database
- {
- public function connect() { }
- public function disconnect() { }
- public function select() { }
- public function insert() { }
- public function delete() { }
- public function update() { }
- }
function connect()
This function will be fairly basic, but creating it will require us to first create a few variables. Since we want to make sure that they can’t be accessed from outside our class, we will be setting them as private. These variables will be used to store the host, username, password and database for the connection. Since they will pretty much remain constant throughout, we don’t even need to create modifier or accessor methods for it. After that, we’d just need to create a simple mysql statement to connect to the database. Of course, since as programmers we always have to assume the user (even if it is us) will do something stupid, lets add an extra layer of precaution. We can check if the user has actually connected to the database first, and if they have, there really isn’t a need to re-connect. If they haven’t then we can use their credentials to connect.
- private db_host = ‘’;
- private db_user = ‘’;
- private db_pass = ‘’;
- private db_name = ‘’;
- public function connect()
- {
- if(!$this->con)
- {
- $myconn = @mysql_connect($this->db_host,$this->db_user,$this->db_pass);
- if($myconn)
- {
- $seldb = @mysql_select_db($this->db_name,$myconn);
- if($seldb)
- {
- $this->con = true;
- return true;
- } else
- {
- return false;
- }
- } else
- {
- return false;
- }
- } else
- {
- return true;
- }
- }
As you can see, it makes use of some basic mysql functions and a bit of error checking to make sure that things are going according to plan. If it connects to the database successfully it will return true, and if not, it will return false. As an added bonus it will also set the connection variable to true if the connection was successfully complete.
public function disconnect()
This function will simply check our connection variable to see if it is set to true. If it is, that means that it is connected to the database, and our script will disconnect and return true. If not, then there really isn’t a need to do anything at all.
- public function disconnect()
- {
- if($this->con)
- {
- if(@mysql_close())
- {
- $this->con = false;
- return true;
- }
- else
- {
- return false;
- }
- }
- }
public function select()
This is the first function where things begin to get a little complicated. Now we will be dealing with user arguments and returning the results properly. Since we don’t necessarily want to be able to use the results right away we’re also going to introduce a new variable called result, which will store the results properly. Apart from that we’re also going to create a new function that checks to see if a particular table exists in the database. Since all of our CRUD operations will require this, it makes more sense to create it separately rather than integrating it into the function. In this way, we’ll save space in our code and as such, we’ll be able to better optimize things later on. Before we go into the actual select statement, here is the tableExists function and the private results variable.
- private $result = array();
- private function tableExists($table)
- {
- $tablesInDb = @mysql_query(‘SHOW TABLES FROM ‘.$this->db_name.’ LIKE “‘.$table.'”‘);
- if($tablesInDb)
- {
- if(mysql_num_rows($tablesInDb)==1)
- {
- return true;
- }
- else
- {
- return false;
- }
- }
- }
This function simply checks the database to see if the required table already exists. If it does it will return true and if not, it will return false.
- public function select($table, $rows = ‘*’, $where = null, $order = null)
- {
- $q = ‘SELECT ‘.$rows.’ FROM ‘.$table;
- if($where != null)
- $q .= ‘ WHERE ‘.$where;
- if($order != null)
- $q .= ‘ ORDER BY ‘.$order;
- if($this->tableExists($table))
- {
- $query = @mysql_query($q);
- if($query)
- {
- $this->numResults = mysql_num_rows($query);
- for($i = 0; $i < $this->numResults; $i++)
- {
- $r = mysql_fetch_array($query);
- $key = array_keys($r);
- for($x = 0; $x < count($key); $x++)
- {
- // Sanitizes keys so only alphavalues are allowed
- if(!is_int($key[$x]))
- {
- if(mysql_num_rows($query) > 1)
- $this->result[$i][$key[$x]] = $r[$key[$x]];
- else if(mysql_num_rows($query) < 1)
- $this->result = null;
- else
- $this->result[$key[$x]] = $r[$key[$x]];
- }
- }
- }
- return true;
- }
- else
- {
- return false;
- }
- }
- else
- return false;
- }
While it does seem a little scary at first glance, this function really does a whole bunch of things. First off it accepts 4 arguments, 1 of which is required. The table name is the only thing that you need to pass to the function in order to get results back. However, if you want to customize it a bit more, you can do so by adding which rows will be pulled from the database, and you can even add a where and order clause. Of course, as long as you pass the first value, the result will default to their preset ones, so you don’t have to worry about setting all of them. The bit of code right after the arguments just serves to compile all our arguments into a select statement. Once that is done ,a check is done to see if the table exists, using our prior tableExists function. If it exists, then the function continues onwards and the query is performed. If not, it will fail.
The next section is the real magic of the code. What it does is gather the columns and data that was requested from the database. It then assigns it to our result variable. However, to make it easier for the end user, instead of auto-incrementing numeric keys, the names of the columns are used. In case you get more than one result each row that is returned is stored with a two dimensional array, with the first key being numerical and auto-incrementing, and the second key being the name of the column. If only one result is returned, then a one dimensional array is created with the keys being the columns. If no results are turned then the result variable is set to null. As I said earlier, it seems a bit confusing, but once you break things down into their individual sections, you can see that they are fairly simple and straightforward.
public function insert()
This function is a lot simpler than our prior one. It simply allows us to insert information into the database. As such we will require an additional argument to the name of the table. We will require a variable that corresponds to the values we wish to input. We can simply separate each value with a comma. Then, all we need to do is quickly check to see if our tableExists, and then build the insert statement by manipulating our arguments to form an insert statement. Then we just run our query.
- public function insert($table,$values,$rows = null)
- {
- if($this->tableExists($table))
- {
- $insert = ‘INSERT INTO ‘.$table;
- if($rows != null)
- {
- $insert .= ‘ (‘.$rows.’)’;
- }
- for($i = 0; $i < count($values); $i++)
- {
- if(is_string($values[$i]))
- $values[$i] = ‘”‘.$values[$i].'”‘;
- }
- $values = implode(‘,’,$values);
- $insert .= ‘ VALUES (‘.$values.’)’;
- $ins = @mysql_query($insert);
- if($ins)
- {
- return true;
- }
- else
- {
- return false;
- }
- }
- }
As you can see, this function is a lot simpler than our rather complex select statement. Our delete function will actually be even simpler.
public function delete()
This function simply deletes either a table or a row from our database. As such we must pass the table name and an optional where clause. The where clause will let us know if we need to delete a row or the whole table. If the where clause is passed, that means that entries that match will need to be deleted. After we figure all that out, it’s just a matter of compiling our delete statement and running the query.
- public function delete($table,$where = null)
- {
- if($this->tableExists($table))
- {
- if($where == null)
- {
- $delete = ‘DELETE ‘.$table;
- }
- else
- {
- $delete = ‘DELETE FROM ‘.$table.’ WHERE ‘.$where;
- }
- $del = @mysql_query($delete);
- if($del)
- {
- return true;
- }
- else
- {
- return false;
- }
- }
- else
- {
- return false;
- }
- }
And finally we get to our last major function. This function simply serves to update a row in the database with some new information. However, because of the slightly more complex nature of it, it will come off as a bit larger and infinitely more confusing. Never fear, it follows much of the same pattern of our previous function. First it will use our arguments to create an update statement. It will then proceed to check the database to make sure that the tableExists. If it exists, it will simply update the appropriate row. The hard part, of course, comes when we try and create the update statement. Since the update statement has rules for multiple entry updating (IE – different columns in the same row via the cunning use of comma’s), we will need to take that into account and create a way to deal with it. I have opted to pass the where clause as a single array. The first element in the array will be the name of the column being updated, and the next will be the value of the column. In this way, every even number (including 0) will be the column name, and every odd number will be the new value. The code for performing this is very simple, and is presented below outside the function:
- for($i = 0; $i < count($where); $i++)
- {
- if($i%2 != 0)
- {
- if(is_string($where[$i]))
- {
- if(($i+1) != null)
- $where[$i] = ‘”‘.$where[$i].'” AND ‘;
- else
- $where[$i] = ‘”‘.$where[$i].'”‘;
- }
- else
- {
- if(($i+1) != null)
- $where[$i] = $where[$i]. ‘ AND ‘;
- else
- $where[$i] = $where[$i];
- }
- }
- }
The next section will create the part of the update statement that deals with actually setting the variables. Since you can change any number of values, I opted to go with an array where the key is the column and the value is the new value of the column. This way we can even do a check to see how many different values were passed to be updated and can add comma’s appropriately.
- $keys = array_keys($rows);
- for($i = 0; $i < count($rows); $i++)
- {
- if(is_string($rows[$keys[$i]]))
- {
- $update .= $keys[$i].’=”‘.$rows[$keys[$i]].'”‘;
- }
- else
- {
- $update .= $keys[$i].’=’.$rows[$keys[$i]];
- }
- // Parse to add commas
- if($i != count($rows)-1)
- {
- $update .= ‘,’;
- }
- }
Now that we’ve got those two bits of logic out of the way, the rest of the update statement is easy. Here it is presented below:
- public function update($table,$rows,$where)
- {
- if($this->tableExists($table))
- {
- // Parse the where values
- // even values (including 0) contain the where rows
- // odd values contain the clauses for the row
- for($i = 0; $i < count($where); $i++)
- {
- if($i%2 != 0)
- {
- if(is_string($where[$i]))
- {
- if(($i+1) != null)
- $where[$i] = ‘”‘.$where[$i].'” AND ‘;
- else
- $where[$i] = ‘”‘.$where[$i].'”‘;
- }
- }
- }
- $where = implode(‘=’,$where);
- $update = ‘UPDATE ‘.$table.’ SET ‘;
- $keys = array_keys($rows);
- for($i = 0; $i < count($rows); $i++)
- {
- if(is_string($rows[$keys[$i]]))
- {
- $update .= $keys[$i].’=”‘.$rows[$keys[$i]].'”‘;
- }
- else
- {
- $update .= $keys[$i].’=’.$rows[$keys[$i]];
- }
- // Parse to add commas
- if($i != count($rows)-1)
- {
- $update .= ‘,’;
- }
- }
- $update .= ‘ WHERE ‘.$where;
- $query = @mysql_query($update);
- if($query)
- {
- return true;
- }
- else
- {
- return false;
- }
- }
- else
- {
- return false;
- }
- }
Now that we have that we’ve finished our last function, our simple CRUD interface for MySQL is complete. You can now create new entries, read specific entries from the database, update entries and delete things. Also, be creating and reusing this class you’ll find that you are saving yourself a lot of time and coding. Ah, the beauty of object oriented programming.
The Use
So we’ve got our class all made, but how do we use it? This part is simple. Lets start by creating a very simple system database to use in our testing. I created a database called test, and then ran the MySQL statment. You can place it in any database that you like, just make sure that you change the connection variables at the top of the script to match:
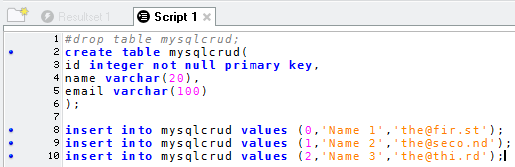
The first line is commented out simply because not everyone will need it. If you need to run that more than once, you will need to uncomment it the second time to ensure that it creates the table.
Now that our table is created and populated, it’s time to run a few simple queries on it.
- <?php;
- include(‘crud.php’);
- $db = new Database();
- $db->connect();
- $db->select(‘mysqlcrud’);
- $res = $db->getResult();
- print_r($res);
- ?>
If done correctly, you should see the following:

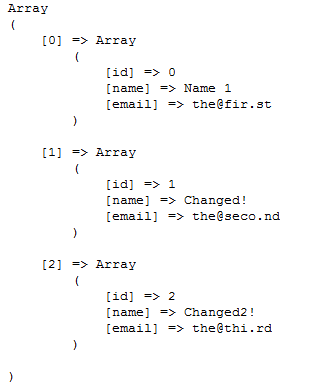
Likewise we can go a step further and run an update query, and then output the results:
- <?php;
- $db->update(‘mysqlcrud’,array(‘name’=>’Changed!’),array(‘id’,1));
- $db->update(‘mysqlcrud’,array(‘name’=>’Changed2!’),array(‘id’,2));
- $res = $db->getResult();
- print_r($res);
- ?>
We should see this
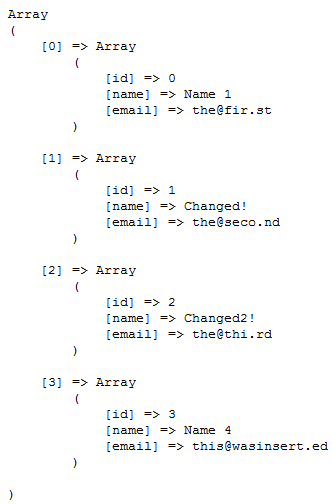
Now for a simple insert statement:
- ;<?php;
- $db->insert(‘mysqlcrud’,array(3,”Name 4″,”this@wasinsert.ed”));
- $res = $db->getResult();
- print_r($res);
- ?>